Using Gpio On The Pi Sense Hat – Sense Hat Raspberry Pi
Di: Everly
Access to GPIO pins on HAT
Place the Sense HAT on the GPIO pins, carefully aligning them before pressing down firmly so that it properly attaches to the Raspberry Pi. Once that’s done, turn the
Ever wanted to use the Raspberry Pi SenseHat, but also want to attached some other components to the GPIO pins. At first glance this does not look possible,
The Raspberry Pi Sense HAT V2 is the perfect product to learn about programming and how we interact with the world around us. With its full array of sensors, the Sense HAT was originally
树莓派(Raspberry Pi)官方文档. RTIMULib is a C++ and Python library that makes it easy to use 9-dof and 10-dof IMUs with embedded Linux systems. A pre-calibrated settings file is
- Sense HAT at Raspberry Pi GPIO Pinout
- Removing HATs from the Pi
- Sense HAT GPIO Pins Broke Off
- Access to GPIO pins on HAT
Currently, I’m wondering about the compatibility of the Raspberry Pi 5 with the Sense HAT. I’ve already mounted a cooler on the Pi 5, but I’m unsure if there’s a solution to
I have a Raspberry Pi Sense HAT. I want to run the Sense HAT at the same time I run a Pulsed Light LiDAR Lite (which communicates with the RPi via i2c but not the same
To use the Sense HAT, a Raspberry Pi with a 40-pin GPIO header is required, along with some software installations. What You Will Need Hardware: Raspberry Pi (any model with a 40-pin GPIO header) Sense HAT;
The ribbon cable connects to the GPIO pins on the Pi. The DS18B20 has three wires. The red wire connects to 3.3V. The blue/black wire connects to ground.
Adafruit Industries, Unique & fun DIY electronics and kits Raspberry Pi Sense HAT – any Raspberry Pi with 2×20 Connector : ID 2738 – Control the same hardware as used in space
Note that the GPIO extension header can be removed safely from the Pi and Sense HAT (provided all other cables are disconnected and the power is off of course).
a well known/working fine since years on ANY Pi – including Pi5 – DPI display setup stops working on Pi5 with M.2 HAT+ connected. Only thing connected to GPIO on the M.2
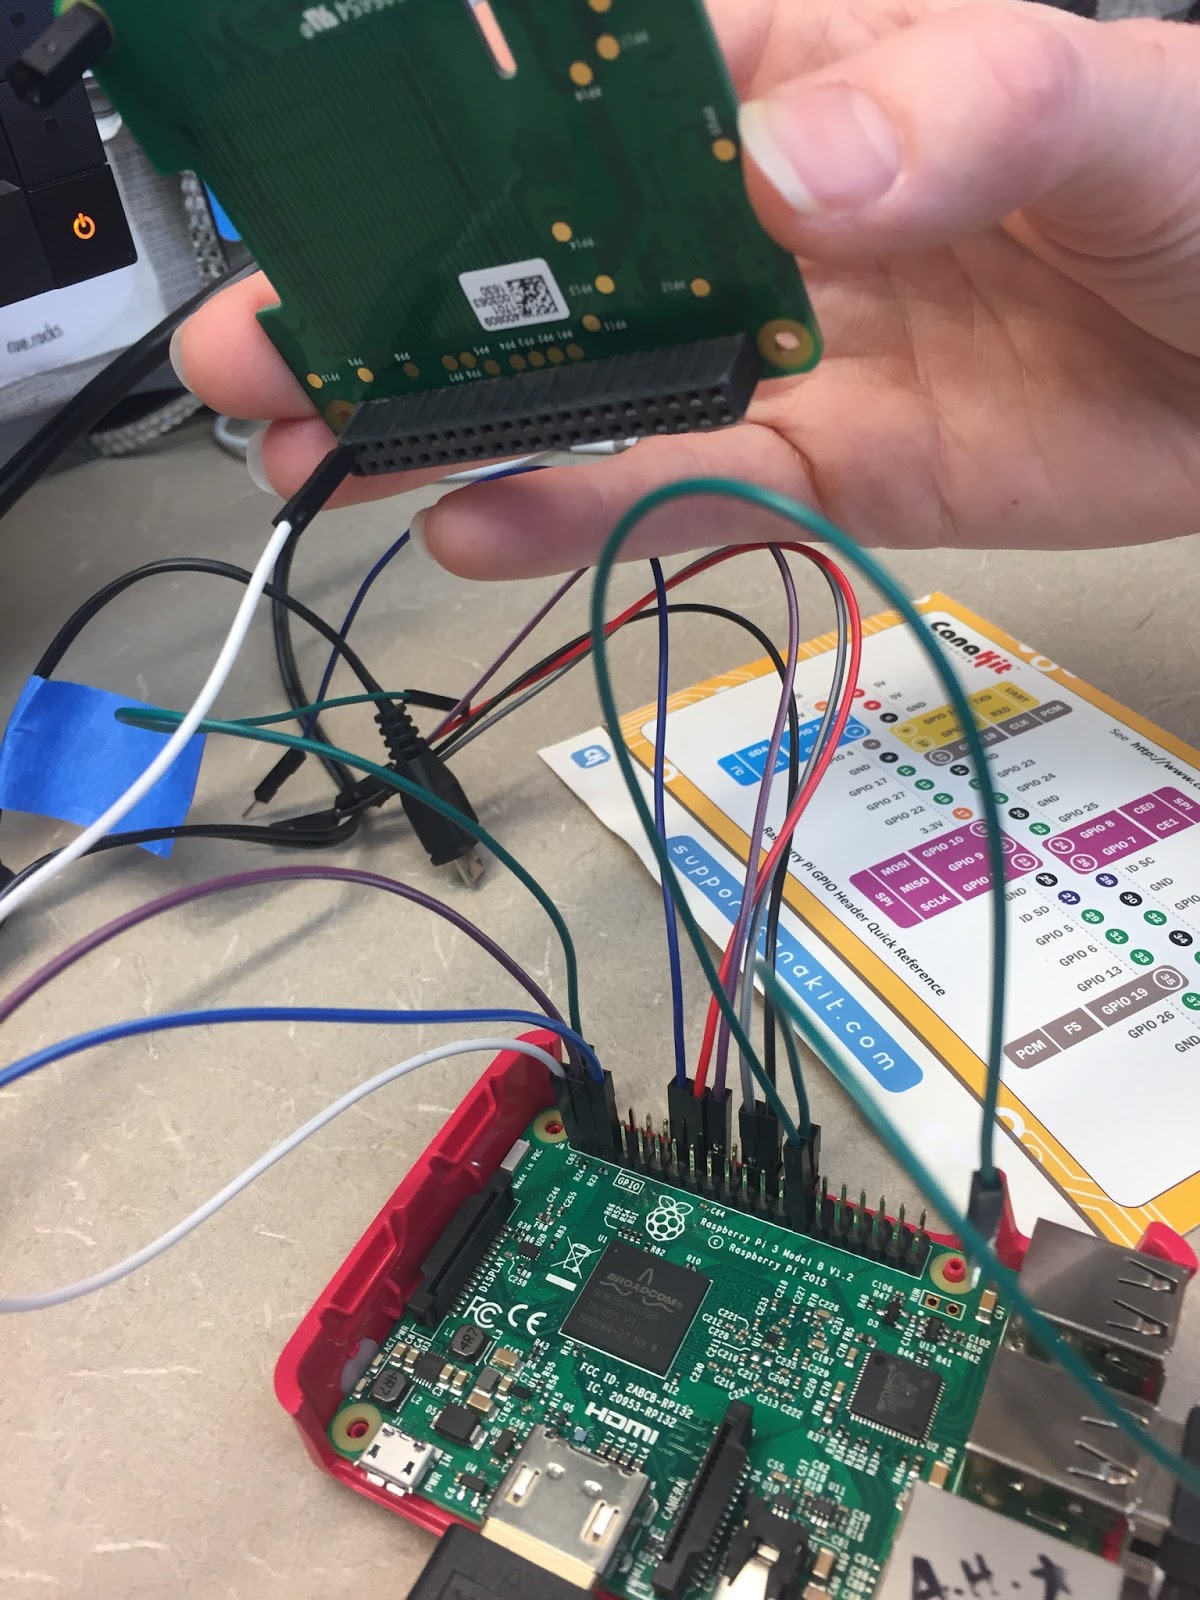
I am wondering which GPIO pins the Sense HAT uses, so I could use attach it to the Raspberry Pi with jumper wires and then use other GPIO pins. Thanks!
The Sense HAT Expansion Card (Reference La Scienza con il Raspberry pi – Marco Casolino). One of the most interesting features of the Raspberry – which differentiates it
i2c can be shared, I’m doing it on several of my Pi’s. On one Pi I have a Sense Hat, DS3231, SI1145, and BMP180 all connected to the same i2c pins. They all work no problem. I
- Raspberry Pi Sense HAT: Supercharge your Pi
- Raspberry Pi Sense HAT V2
- Product Name: Raspberry Pi Sense HAT
- How to use a GPIO pin after I put on a HAT?
- Best Ribbon Cable for Sense Hat?
Does anyone have any advice on how to get the Sense HAT working with a GPIO extension cable? I bought an extension from Pimoroni, and a 40 pin male-male IDE header
Attach the Sense HAT to all 40 GPIO pins with the Pi turned off. You may want to use some M2.5 standoffs to support the front of the Sense HAT. 2. Power up your Raspberry Pi. 3. Open Thonny, found
Attach the Sense HAT to all 40 GPIO pins with the Pi turned off. You may want to use some M2.5 standoffs to support the front of the Sense HAT. 2. Power up your Raspberry Pi. 3. Open
Raspberry Pi: Using GPIO on the Pi Sense HatHelpful? Please support me on Patreon: https://www.patreon.com/roelvandepaarWith thanks & praise to God, and wit
You’ve solved it, thank you. The problem was, I had a program that used gpio and it was running on startup, because the commands were still in rc.local. I just disabled that and
You can access the GPIO pins from the Sense Hat. However, it requires some minor physical modification to the Sense Hat board. Here are the steps I saw explained in a
Prerequisites. Below are some things you will need to get started with GPIO programming with C++. Raspberry Pi board: You can use any Raspberry Pi model that meets
Also, my research has led me to believe that the Hat uses 6 GPIO pins which will leave me plenty for my motors, how would I go about using these? Thanks for your help.
Obviously, the Pi400 doesn’t allow HATs to be installed normally. I’m using an Adafruit Cyber Deck to bring out the GPIO header for access. When I connect the Sense Hat
The Raspberry Pi Sense HAT V2 is attached on top of the Raspberry Pi via the 40-pin GPIO pins (which provide the data and power interface) to create an ‘Astro Pi’. The Sense HAT has several integrated circuit based sensors can be used
According to the pinout, it only uses 5 GPIO pins, so plenty of room to add something else. The problem is, I’m not sure what’s the best way to physically attach something after the hat is
I am trying to use the magnetometer on the sense hat to act as a compass however I also want to utilise the GPIO pins for other components. I’ve successfully wired up
I am trying to use the magnetometer on the sense hat to act as a compass however I also want to utilise the GPIO pins for other components. I’ve successfully wired up
If you don’t need any of the other GPIO pins, it is also easy enough to use a GPIO cable extender to connect your Sense Hat without attaching it directly onto the Pi itself. But, if
- Le Vocabulaire De La Famille En Français
- Veronika Montgomery
- Lautsprecher Für Mercedes-Benz C-Klasse W202
- Solaimahn Amiri It-Dienstleistungen In Hamburg 22045
- Ikea Hopen Kommode In Baden-Württemberg
- Staubsauger Für Tierhaare Test : Die 6 Besten Tierhaarstaubsauger
- Lico Schuhe Online Kaufen » Lico Schuhe Bei Baur
- Short Creepy Stories Dollhouse Key Location Guide
- Sonnenbrillen Po3268S
- Drowning In Traditional Chinese
- Burning Diamonds: How To Make Diamonds Burn
- Die Top-Elf Des 25. Spieltags: Top Elf Der Bundesliga